Pages

Monday 13 March 2017

Default iOS Restrictions Passcode; and what to do if you've changed it but forgotten your code.

With the release of – I think – iOS 10, Apple enabled 'Restrictions' by default. This is the section of iOS where parental controls etc. are. That wouldn't normally be an issue for most people, but if you need to send your device for repair, or are going to sell it, you'll want to erase all content and settings, and to do this you'll need that passcode (which is separate to your normal device passcode).

Not exceptionally well documented is the fact that the default restrictions passcode is: 1234

If that doesn't work, and you've forgotten what you changed it to, you can use Gareth Watts' superb Pinfinder (https://github.com/gwatts/pinfinder). You need an unencrypted iTunes backup to do so, but that's easily done (just remember to turn encryption back on for subsequent backups!).


Sunday 19 February 2017

Atari 8-bit SIO2SD

The SIO2SD device for the Atari 8-bit range is a fantastic piece of kit, allowing you to run software from an SD device on your Atari. It's difficult for a new user to pick up though, so I put together some instructions to try and make things simpler:

File structure:

Place the Loader file in the root of the SD card, ensuring it is called: sio2sd.xex
Create a folder called ATARI that contains all of your files in whatever directories you wish.


Loader Instructions (v3.5):

ARROWS/JOYSTICK: select directory/file (.xex) or disk image (.atr)
RETURN/FIRE: enter directory/load file/disk image
KEYS 1-8: mount selected file/image into drives 1-8
ESC: go back through the directory tree.
X: (long press) restart computer with selected image(s).

CTRL+T: lets you toggle between real drives / virtual drives

Lots of software needs BASIC to be disabled. In this case, press and hold the OPTION key on your Atari, then press X to reboot and keep holding OPTION for a few seconds until the software starts to load.


To ensure the Loader software is run at each boot:

On SIO2SD double press SHIFT to get into Config mode.
Press K1 button until “cfgtool mode:" is displayed.
Press K2 button to select "every startup".
Press K3 button.
Press K1 button until "topdrive mode:" is displayed.
Press K2 button to set it to "off".
Turn off computer.
Turn on computer.


To upgrade firmware:

You MUST put the firmware on a standard SD card, SDHC or SDXC will not work.

Place the firmware file in the root of the SD card, ensuring it is called: sio2sd.bin

Turn on the Atari, either holding SHIFT down at boot, OR double-pressing SHIFT once booted to get into Config mode. Then press SHIFT-K3 on the SIO2SD. It will ask you to confirm the firmware update with K2.

Once done and you have seen an “OK” confirmation message, power off and on. The status display on the SIO2SD will tell you which firmware version you have.

Friday 14 October 2016

Outlining Text in Adobe Acrobat X (or Higher)

Thanks to Best Font Forward for this tutorial:

Outlining Text in Adobe Acrobat X (or Higher)

This article describes how to outline text in Adobe Acrobat X. An older article has information about outlining text in Acrobat versions 7, 8, and 9.
16 April 2013: It looks like Adobe broke this feature with an update to Acrobat. Fortunately, a trick that worked in prior versions still works, but it adds a couple of small steps to the procedure. I have updated this article accordingly.
By far, the most popular article on this blog is about outlining text in Acrobat, a task that became notoriously difficult after Acrobat 6.. An update post for Acrobat X is long overdue.
The Scenario
Here’s the scenario I posed in my previous article on outlining text: you need to make a small change to a graphic file, the deadline is looming, all you have is a PDF, you don’t have access to the source files, and you don’t have the fonts installed. Without the fonts, you can’t open the PDF in Illustrator without jacking up the text. You can’t wait to get access to the source file because you’ll lose your place in your commercial printer’s queue. What do you do?
The proposed workaround is this: open the PDF in Acrobat, outline the text, save your changes, open the PDF in Illustrator, and make your minor adjustments there.
Outlining Text in Acrobat X Pro
In Acrobat X, the process of outlining text is much easier than it was in versions 7, 8, and 9. Adobe restored the ability to outline text without having to fuss around with watermarks or other workarounds. The trouble is finding the feature. It’s buried in the Flattener Preview window, which is buried in Adobe’s answer to Microsoft’s ribbon based navigation.
Again a few caveats before proceeding:
  • The text will retain its formatting, but will no longer be editable.
  • If the PDF is going online, screen readers for the visually impaired will not be able to read it.
  • If the problem you want to fix is textual, you’re pretty much screwed. You’ll need to edit the source files.
Follow the steps below to convert text to outlines in Adobe Acrobat X Pro:
  1. Open the PDF or EPS file in Acrobat.
    (You want to open the file in Acrobat, because Acrobat will display the type correctly, using fonts embedded in the file, even if the fonts are not installed on your computer.)
  2. Click Tools and click Pages.
  3. Click Watermark and select Add Watermark.
    The Add Watermark window opens.
  4. Type a period (or any other character) in the Text text box.
  5. Drag the Opacity slider to 0%.
    Applying a watermark in Acrobat.
    You’ll need to add a textual watermark before outlining the text. Kick the font size down and set the opacity to zero so the watermark doesn’t interfere with the appearance of your document.
  6. Click OK.
  7. Click Tools and click Print Production.
    If you don’t see the Print Production panel under Tools, do this:
    a. Click the View menu.
    b. Select Tools.
    c. Select Print Production.
    The Print Production panel opens under Tools.
  8. Click Flattener Preview.
    Accessing Flattener Preview can be a little tricky.
    The Flattener Preview window opens.
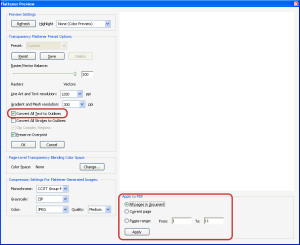
  9. Select the Convert All Text to Outlines check box.
  10. Select the pages you need to convert to text from the Apply to PDF group.
  11. Click Apply.
    Flattener Preview settings
    Simply select the Convert All text to Outlines check box.
    If Acrobat warns you that the operation cannot be undone, click Yes to proceed.
  12. Click OK to close the Flattener Preview window.
  13. Click File and select Save As to save your outlined text PDF as a different file from your original.
  14. Close the file in Acrobat and open it in Illustrator.
    You’ll notice that the text displays as it should, because it’s outlined. You can’t edit the text, but at least you can change the graphics to your heart’s content.

Monday 25 July 2016

A warning about videogames and your kids

I originally researched and wrote this article on the dangers of videogames and online gaming / social media for my child's school to distribute. I was concerned about some of the language and behaviour I was seeing as a result of gaming (online and offline), and social media use at such young ages. I've never allowed my son to use social media, and from the moment I became aware of the bullying and abuse that was happening he has been banned from online play indefinitely. 
Unfortunately, the school wouldn't distribute this document as it had come from a third party, and out of respect for what they were doing internally I didn't publish it anywhere. They've now sent out a letter to all KS2 classes that echoes some of this after a survey of the kids in school, and a visit from a member of the Metropolitan Police, so that's progress (and I'll share the content of that in another post) but for now I'm posting this so that others can be informed with some information they may not have already.
I should add, too, that anyone who knows me relatively well will know that I'm tech-savvy, so I had locked down as much as the controls would allow. There are some not-so-obvious ways people can get around the limitations of those controls though, resulting in ephemeral channels being made available to kids to abuse each other, or for adults to abuse kids, or vice-versa. I cannot overemphasise how much of a problem this is, so if you have even the slightest concern about what your kids are doing online (or offline) you should look into it.
https://drive.google.com/open?id=0B3crT89BHvGiT2dqTm42SUIzeX

Wednesday 13 January 2016

Getting Illustrator vectors in to Mac Powerpoint and keeping them editable

UPDATED 31/07/17 for Office Mac 2016. 
Original method from Kerry Clark in this article.

How to Get Illustrator Vectors Into Mac PowerPoint


I always run into this problem. Someone wants a map or design in Microsoft PowerPoint®. But it has to be editable. No problem if I build it in PowerPoint. But, I don't work that way. It's way harder than it needs to be. I prefer to work in a program that's built for vector-based image building.
  1. Go ahead and build your file in Illustrator.
  2. Export your art as an EMF (enhanced metafile).
  3. If you don't have OpenOffice, download it. It's free. (It's a great program, by-the-way, even if you already have Microsoft Office.) The reason you need to do this is that PowerPoint for the Mac will convert vectors into non-editable raster images. However, OpenOffice will.
  4. Import your EMF artwork into OpenOffice (in Presentation mode).
  5. Right-click the art and select Break.
  6. Save this file as a PPT file. OFFICE 2016 NOTE: If you are using Office 2016 you should save it in the ODF format (an ODP extension on your file). You may even get a warning about compatibility when you save as PPT from within OpenOffice. If you 'allow' the change in format to occur, you will end up with an ODF format (ODP extension) file as well.
  7. Office 2016 MUST have internet access, as when you open your created file it will connect to Microsoft servers to enable ODP file conversion.
  8. The file will be read-only once converted, so save as a PPT from within Powerpoint and you can then edit that newly created file.

Saturday 20 June 2015

Using a PS2 Eye Toy camera as a mic on Mac OS X

Recently I was trying to find a way of using a PS3 USB Eye camera as a webcam on my Mac running OS X 10.10 (Yosemite). Unfortunately, the Mac doesn't recognise it, and the only drivers that existed courtesy of Macam don't work on Yosemite.

This made me remember I also had a PS2 Eye Toy USB camera lurking in a drawer, so thought I'd try that. Again, no joy on the webcam, but as a side effect when I tried it in Skype it CAN be recognised and used as a USB microphone. I'm fairly certain it's very low-tech, and doesn't have noise cancelling or anything, but it was fine for use on the Skype test call - I've not tried it in a real-world situation yet, but hopefully it will be fine for the very rare Skype call I need to accept on my Mac mini that lacks a built in webcam (obviously) or mic.

Wednesday 25 March 2015

Hacking Philips Hotel Televisions

First off, thanks to Rowan for the original guide on how to do this over at http://www.rownet.co.uk/hacking-philips-hotel-televisions/

I'm just replicating it here as another source on the interwebs, and to add a little information from my own personal experience that may help others.

When I powered on the TV in the room when I arrived, the channel was set to 'CARD-CVBS'. After trying out the steps below (which were required, I should add) I had to disconnect the hotel feed from the TV to enable the HDMI channel to remain selected and not be overridden by the main feed.

Worked a treat after that!

Thanks again to Rowan for the original.

---

If you are ever in a Hotel and want to connect a device via HDMI to the flat screen LCD or Plasma you are normally out of luck as the Hotel locks down the TV so that you cannot change anything. They usually do this so that you cannot get round their pay-per-view channels etc. They also replace the normal remote with another remote with limited buttons and options. When you try to change to one of the AV inputs on the set you are normally greeted with an menu disabled warning or something similar.

There is a way around this though.

Using the remote enter the following key sequence:

3 1 9 7 5 3 mute
The buttons have to be pressed in quick succession without any mistakes. Things change in the background whilst your entering the code, don’t pay any attention to that.

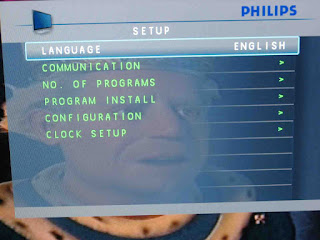
If you’ve entered the code correctly you will be greeted with a menu similar to this one:
That’s not my reflection in the background by the way. That’s the king in Shrek.


Choose Program Install using the navigation buttons on the remote. It’s worth noting that most Hotel TV remotes are different so you may have to improvise here.

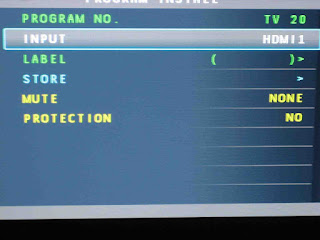
Once in the Program Install menu you will be greeted with another menu:


Using the number digits, choose a high numbered channel under Program No. so as not to interfere with the Hotels channel presets. It’s probably best you look for a free preset before doing this. Then under Input choose the relevant AV input. For me, I was using HDMI1.

That’s it. Use the navigation buttons or menu button to exit and your device will now be viewable under your chosen channel number. Please note, you still wont be able to choose an AV input using the remote, what this does is assign that AV input to a channel preset as if it were an analog or digital broadcast channel.

Remember, please respect the hotel and be sure to remove your preset prior to checking out.

Enjoy!