Thanks to Best Font Forward for this tutorial:
Outlining Text in Adobe Acrobat X (or Higher)
This article describes how to outline text in Adobe Acrobat X. An older article has information about outlining text in Acrobat versions 7, 8, and 9.By far, the most popular article on this blog is about outlining text in Acrobat, a task that became notoriously difficult after Acrobat 6.. An update post for Acrobat X is long overdue.
16 April 2013: It looks like Adobe broke this feature with an update to Acrobat. Fortunately, a trick that worked in prior versions still works, but it adds a couple of small steps to the procedure. I have updated this article accordingly.
The Scenario
Here’s the scenario I posed in my previous article on outlining text: you need to make a small change to a graphic file, the deadline is looming, all you have is a PDF, you don’t have access to the source files, and you don’t have the fonts installed. Without the fonts, you can’t open the PDF in Illustrator without jacking up the text. You can’t wait to get access to the source file because you’ll lose your place in your commercial printer’s queue. What do you do?
The proposed workaround is this: open the PDF in Acrobat, outline the text, save your changes, open the PDF in Illustrator, and make your minor adjustments there.
Outlining Text in Acrobat X Pro
Again a few caveats before proceeding:
- The text will retain its formatting, but will no longer be editable.
- If the PDF is going online, screen readers for the visually impaired will not be able to read it.
- If the problem you want to fix is textual, you’re pretty much screwed. You’ll need to edit the source files.
- Open the PDF or EPS file in Acrobat.
(You want to open the file in Acrobat, because Acrobat will display the type correctly, using fonts embedded in the file, even if the fonts are not installed on your computer.) - Click Tools and click Pages.
- Click Watermark and select Add Watermark.
The Add Watermark window opens. - Type a period (or any other character) in the Text text box.
- Drag the Opacity slider to 0%.
- Click OK.
- Click Tools and click Print Production.
If you don’t see the Print Production panel under Tools, do this:
a. Click the View menu.
b. Select Tools.
c. Select Print Production.
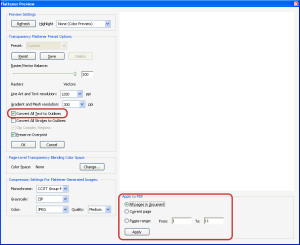
The Print Production panel opens under Tools. - Click Flattener Preview. The Flattener Preview window opens.
- Select the Convert All Text to Outlines check box.
- Select the pages you need to convert to text from the Apply to PDF group.
- Click Apply. If Acrobat warns you that the operation cannot be undone, click Yes to proceed.
- Click OK to close the Flattener Preview window.
- Click File and select Save As to save your outlined text PDF as a different file from your original.
- Close the file in Acrobat and open it in Illustrator.
You’ll notice that the text displays as it should, because it’s outlined. You can’t edit the text, but at least you can change the graphics to your heart’s content.


0 comments:
Post a Comment